Article update history
Updated 2023/07/20: Added link to SuperFlux Reference - Motor Setup Values
Updated 2024/02/23: Added recommended steps for swapping motor into an existing board.
Updated 2024/02/23: Added a note about the detection of a higher Motor L value
Updated 2024/08/01: Major update with Dado’s new video
Updated 2024/12/01: Some restructruring and formatting
Updated 2025/1/15: GTS and info calculator link
A cheat sheet / guide to config a motor. This guide discusses motor values to be adjusted, it does not replace basic understanding of settings.
A lot has changed since this guide was first made and there are many controller, motor & battery options now. I don’t want to bog this guide down with every option. Nothing replaces understanding the basics of your build!
Note: This guide shows the desktop VESC Tool 6.0, but the app version is similar.
This guide also includes the latest updates in @surfdado 's latest Setup Guide Video below
Important Notes and Warnings
- Always back up Motor and App Config to maintain a base if you need to go back
- Don’t forget to “Write” regularly during the setup process. No data is sent to the controller until it is written and changes can be lost when BLE connection is lost during setup
- The wizard is not perfect and some of the parameters need to be adjusted manually
- When using the VESC Tool Desktop version, it doesn’t always connect via Bluetooth and you might have to use Bridge Connectivity, see our guide: How to connect VESC Tool Desktop App via Bluetooth (PC/Mac)
Watch the Setup Video First
Before you start, I recommend you watch it at least once before setup:
Pre-Reqs for swapping a motor into an existing/functioning board
- Re-enable “Motor Cfg > FOC > Offsets > Run calibration at boot”
- Disable (Re)Float Package at “Float Cfg > Specs > Disable Float Package”
- Power cycle the board to let calibration re-run
- Follow the motor config steps shown below. Yes, you need to do all the steps.
- Feel free to disable calibration again after a successful motor configuration and the board works well if you want a faster boot-up time.
This helper makes it easy to find information specific to your build: VESC Tool Config Helper
Step 1: Welcome & Wizards - Set up Motor FOC**
Load Default Parameters = No
EUC
(All motors)
Large Outrunner
Max Power Loss = 400W
Open Loop ERPD = 700
Sensorless ERPM = 2000
Motor Poles = 30
Motor Selection = Yes
Battery Type = LIIION 3_0_4_2
NOTE: Battery cells, capacity, voltage and max current values are dependent on each battery. There are too many options to list them all. It’s important to know your Battery! Ask your battery builder if you have questions
-Stock XR (64V) =15S
-TORque & Stock GT Pack (75.6V) = 18S
-Speed Pac, Floatwheel & Fungi (84V) 20S
-GTS (113V) 27S
-High Voltage Packs (100V) = 24S
-High Voltage Packs (126V) = 30S
-High Voltage Pack (135V) = 32S
Battery Capacity = Only used to calculate range.
Battery Settings = OK
Direct Drive = Checked
Wheel Diameter = 280 Normal / 300 BTG (for speed calculation)
Motor Poles = 30
Hit button Run Detection (Allow the wheel to free spin)
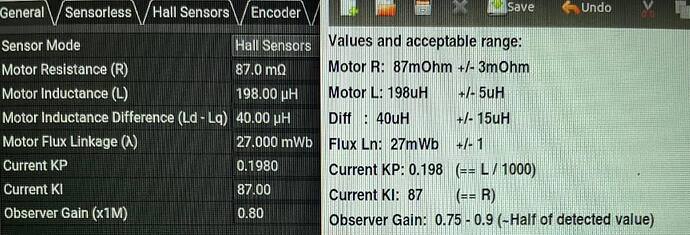
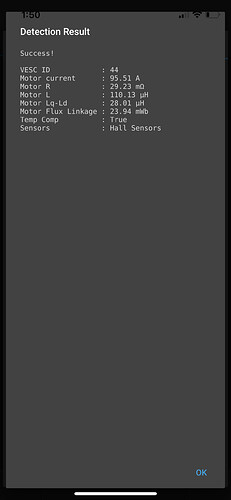
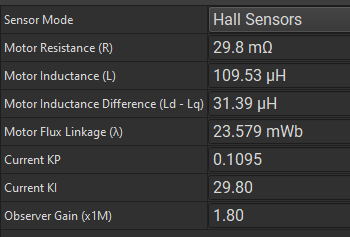
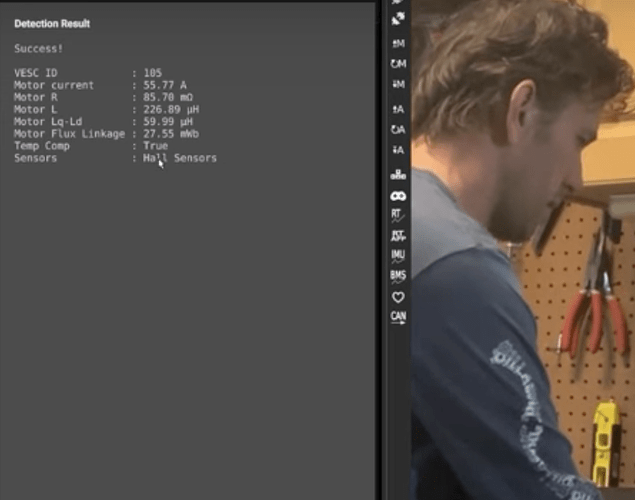
Once the detection is finished, you will se a set of detected values. Here the results can really range based on your motor, controller etc.
Now you have to compare your values with our reference sheet if they are within the correct range.
Consider re-running Motor Wizard if you get a number drastically different than below when configuring HyperCore Motor.
You can find the common motor ranges here: Common Motor FOC Ranges [Resistance, Inductance, Flux Linkage]
For Common SuperFlux Values see SuperFlux Reference - Motor Setup Values
- Motor Inductance (L)/Motor L may sometimes detect around 230.
Step 2. MOTOR SETTINGS - GENERAL (LEFT MENU):
GENERAL TAB:
Invert Motor Direction = Not helpful on setup. Adjust this later if the board rides in reverse after completion.
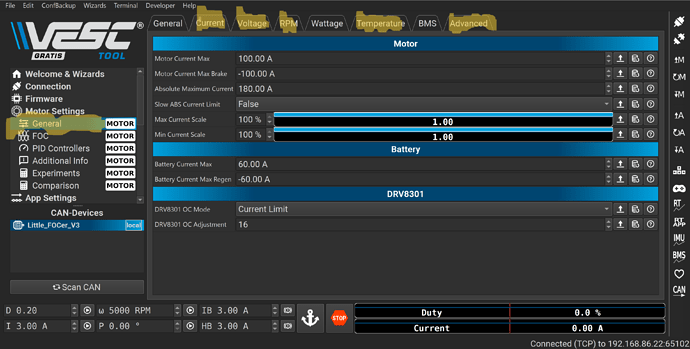
CURRENT TAB:
Suggested numbers. Understand the limits of your controller and Motor plug:
Hypercore:
Motor Current Max = 120A
Motor Current Max Brake = -100A
Absolute Max Current = 180A+
Superflux / Cannon Core:
Motor Current Max = 180A
Motor Current Max Brake = -160A
Absolute Max Current = 270A
Know the limits of your battery:
Battery Current Max = 35A to 60A
Battery Current Max Regen =-30A to -40A
Fungi 50/-40
Torque 60/-40
Me3T 50/-40
Floatwheel 60/-40
GTV 60/-40
GTSV 45/-45
XR/CBXR 35/-30
30s1p P45B 40/-40
VOLTAGE TAB: (Dependent on Battery)
Battery Voltage Cutoff Start = 2.3V per cell (46V for 20s battery)
Battery Voltage Cutoff End = 2.0V per cell (40V for 20s battery)
TEMPERATURE TAB:
Acceleration temp decrease = 0%
MOSFET Temp Cutoff Start = 75C
MOSFET Temp Cutoff End = 85C
Motor Temp Cutoff Start = 80C
Motor Temp Cutoff End = 95C
“Start Cutoff” values will trigger pushback, respect it or risk smoking your motor/controller
ADVANCED TAB
Do not change
3.MOTOR SETTINGS - FOC (LEFT MENU)
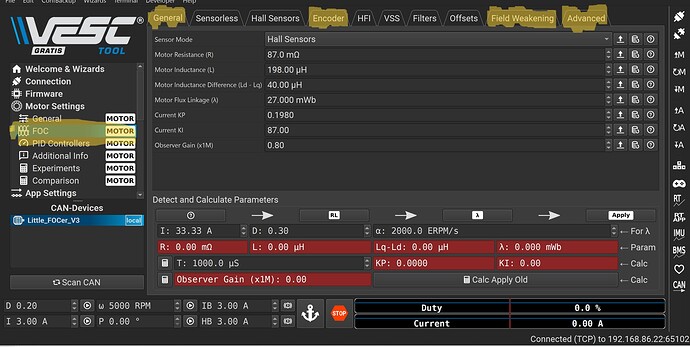
These settings should be set by Wizard, but some may need to be adjusted for “crunch”.
GENERAL TAB:(Crunch)
Observer Gain= ½ wizard value (0.6 - 0.9)
HALL SENSORS TAB:(Crunch)
Sensorless ERPMv = 2000
Hall Inerpolation ERPM = 250
FIELD WEAKENING TAB: (Default should be fine, but adjust to personal preference)
Max Start= 30A - 50A (as low as 10A with high voltage builds)
Duty Start= 60% - 65%
Ramp Time= 300
Q Axis= 2% (don’t touch!)
ADVANCED TAB
Zero Vector Frequency = Controller noise and nose hunting if issued. See video
Motor “Crunch”
Follow this guide to troubleshoot. Reminder to make one change at a time. Motor crunch Troubleshooting: Step by Step
Common causes in this Order:
- Observer gain (FOC-General) = HALF of wizard value
- Sensorless ERPM (FOC-Hall Sensors) = 2000
- Sensor Interpolation ERPM (FOC-Hall Sensors) = 250
- Zero Vector Frequency (FOC-Advanced) = Increase up to 30 max
- Motor Resistance (FOC-General) = increase to 1.2x detected value, e.g. for Hypercore: 105
- Matching KI- KI factor to match their now higher Motor Resistance value.
- (Last resort) switching to the original (ORTEGA) observer. Select that in FOC-Advanced and start over. Ortega Lambda-Comp is also a great option to try out.
Backup and save Motor Config when successful.
These are instructions to calibrate MTR only, not a complete setup. Watch Dado’s video to understand IMU, App & Float Configs
