WARNING!
SURGE ADDS A FUNDAMENTAL CHANGE TO THE FLOAT PACKAGE BEHAVIOR. THIS CODE IS STILL UNDERGOING TESTING. YOU MUST BE PREPARED FOR THE BOARD TO ACT UNPREDICTABLY. THERE MAY BE UNEXPECTED OUTCOMES TO DIFFERENT COMBINATIONS OF PARAMETERS AND SITUATIONS. WEAR SAFETY GEAR AND RIDE WELL WITHIN YOUR LIMITS.
That said I have tested this code on challenging trails. I believe this is very similar to the Onewheel surge behavior except it allows for more flexibility due to the user entries.
INDEX
What is Surge?
Versions
Setup
Surge Parameter Descriptions
How to Help?
What is Surge?
Surge is when the board gives you maximum motor output. The trigger to activate surge is a quick nose dip (pitch differential). When surge is activated it will push the nose up as quickly as possible and will end from a variety of conditions including pitch, current demand, and traction control.
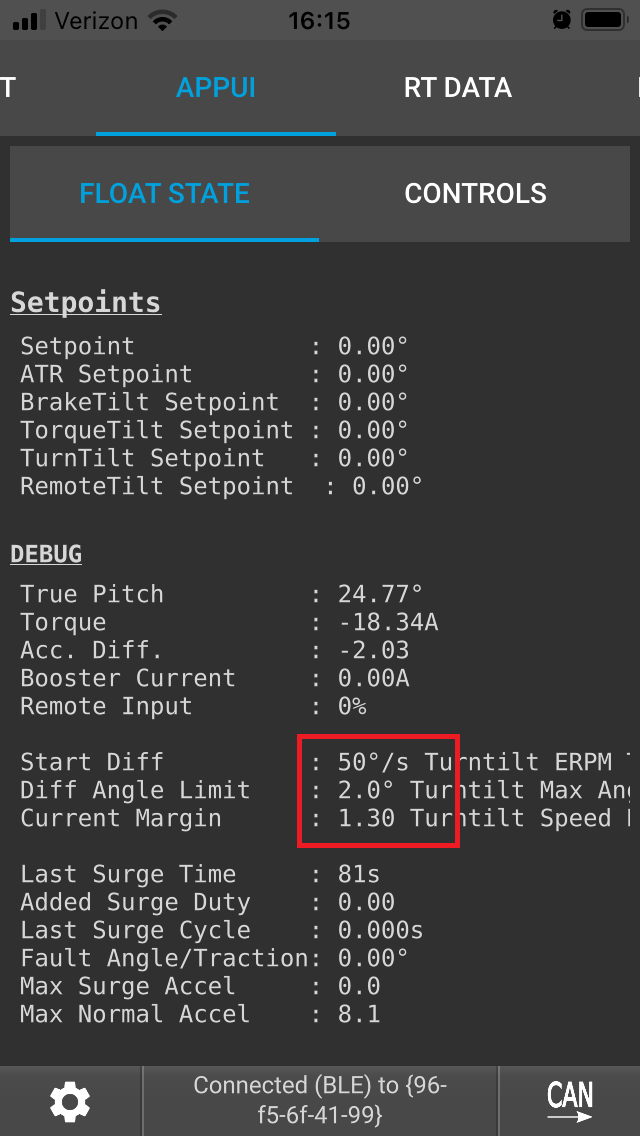
The parameters below control the start and end to surge. User entries are done on FloatCfg->Tune Modifiers->Turn Tiltback. The values are displayed on the AppUI tab along with debug information.
Versions
0.9.1.0 – This is the version most everyone should be using. It has all the safeties I have designed.
0.9.1.0a – This version is only for testing high power motors and motor configurations. Traction control is disabled. More below.
Setup
This package does not change the settings to the necessary default values so you have to do this before riding.
Install version 0.9.1.0
Disconnect and reconnect to load the new AppUI
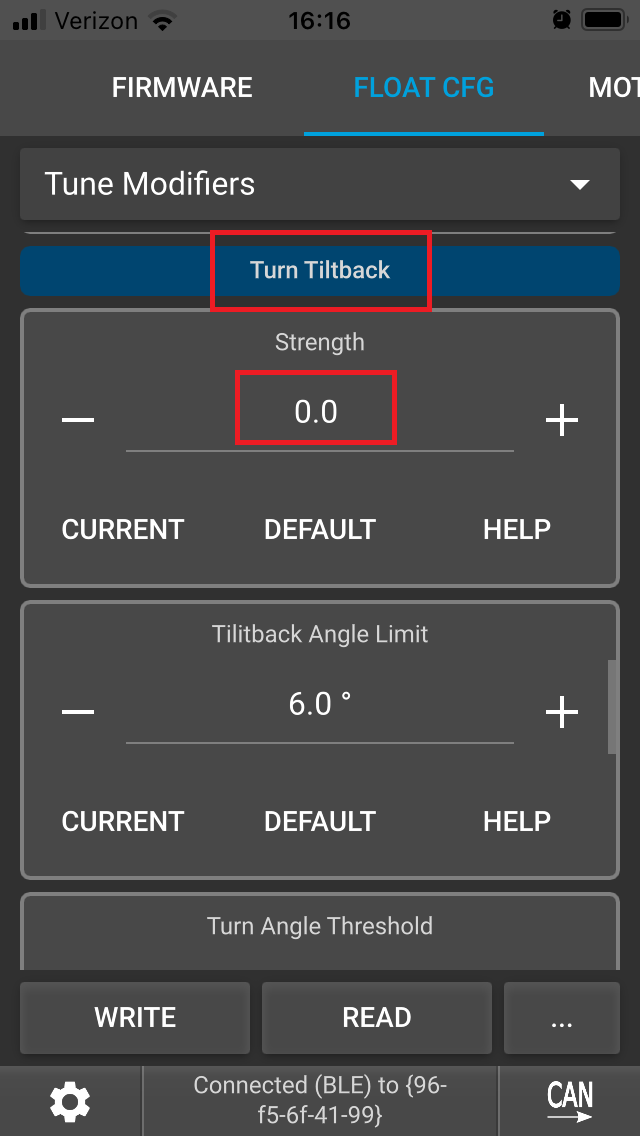
Go to FloatCfg->Tune Modifiers->Turn Tiltback
Set Turn Tilt Strength to 0 (sorry if you use turn tilt. You will have to disable for now.)
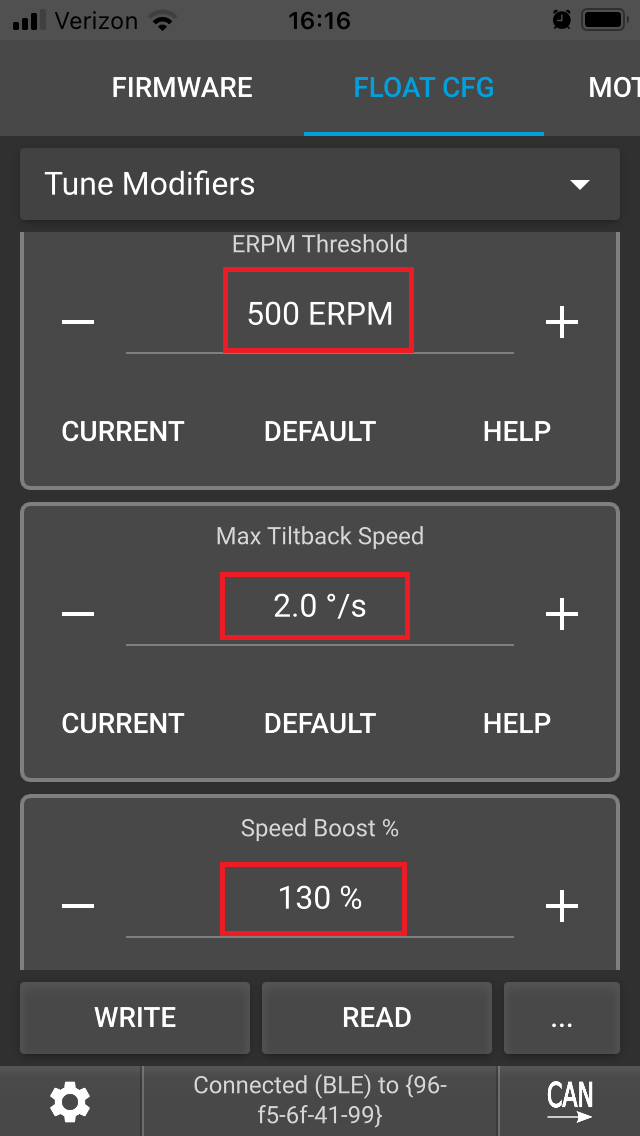
Set Turn Tilt ERPM Threshold to 500
Set Turn Tilt Max Tiltback Speed to 2.0
Set Turn Tilt Start Boost to 130%
Activate the board for a moment and deactivate to check your inputs. Your AppUI screen should look like this.
Surge Parameter Descriptions
Start Angle Speed (degrees/s)
This is the nose dip speed that can initiate surge. Lower speeds allow for surge to be initiated more easily. Higher values will require more effort to surge. This has a relatively low level of importance because the actual angle speed can vary quite a bit. We just need a reasonable boundary between normal nose dipping and nose dipping that causes surge. Default 50.
Differential Limit (degrees)
This is the cumulative pitch required at the Start Angle Speed to initiate surge. This has a high level of importance because it will affect the sensitivity of the surge trigger. A small value can cause nuisance trips in bumpy conditions or initiate the surge too early. A large value will make it hard to surge. Default 2.0.
Current Margin (-)
During surge the PID loop is still running and reports the current demand but this demand is not used. As the pitch returns to the setpoint, this current demand naturally reduces. If it is reduced to less than the surge current (maximum continuous current), the surge cycle ends and PID control can resume.
In addition, the Current Margin is applied to the surge current when compared to the PID demand so that we can end surge later. For example, the surge current is 55A, our pitch is travelling back to setpoint and now demanding 30A. Our surge margin is 1.5. If 30A < 55A / 1.5, we will leave surge. This is true so we will leave surge. In this example, a surge margin of 1.0 would leave surge earlier and at a higher pitch angle and higher current demand.
You will also notice that since this is tied to the PID loop your PID tuning will affect how soon surge ends. Low proportional factors of 10 will leave surge earlier (at higher pitch angles) and may require higher Current Margin to get the surge cycle you want. On the other hand, high proportional factors like 25 will leave surge at much lower pitch angles and have a higher chance of overshooting at high Current Margin.
The minimum recommended value for current margin is 1. Lower values will leave surge early and less than 1 could have negative consequences. High values will leave surge later. This provides more power but could “over-surge” which causes the pitch to overshoot the setpoint. Once surge ends the board can abruptly brake, which causes the board to feel stiff. This has a high level of importance since it is the main condition that ends surge. Default 1.3.
Surge Period (s)
The minimum amount of time between each surge start. Should be greater than surge cycle. The closer the period is to the surge cycle the greater the risk of instability and loss of control. This has a high level of importance since this will provide a delay between surge cycles. Default 0.75. Not a user entry.
Surge Cycle (s)
The maximum amount of time that surge can be engaged. Lower values can give less power. Higher values can cause issues in extreme situations. This has a low level of importance since one of the fault conditions will usually end the surge cycle early. Default .35. Not a user entry.
Minimum Angle (degrees)
The minimum nose down, pitch angle from setpoint in the direction of travel, required to engage and continue surge. Higher values can end surge prematurely. This has a medium level of importance. This will not usually trip but it is important that we are asking for acceleration when we surge. Default 0.05. Not a user entry.
How to Help?
Surge is a very young feature and could use your help to make it better. All the testing to date has been done on a 15s Hypercore setup with 150lb rider. This results in a maximum acceleration of about 25 erpm per code cycle (.0012s). This value is reported on the AppUI screen as Max Surge Accel and Max Norm Accel.
For the surge code 0.9.1.0 we don’t allow surge if the acceleration exceeds 35. This means the wheel has lost traction so we don’t want to surge to make it worse. There is no traction control on the normal acceleration so you will see very high values for that when the wheel spins freely.
This limit of 35 may not be suitable for very high power motor configurations like the Superflux. Since I cannot do this testing myself maybe you can help me.
First you will want to install 0.9.1.0a to remove accelerations limits. To test your setup for maximum acceleration you want flat pavement or even a gentle down slope. Air your tire all the way up for minimal tire resistance (slick tire preferable). Accelerate as fast as you can both using surge and not using surge. The debug will capture your highest acceleration values and reset when you stop and start the board. We want full traction, no wheel slip, for this data.
Come back and report your values along with your motor, battery, rider weight, and tire. Thanks for your help!