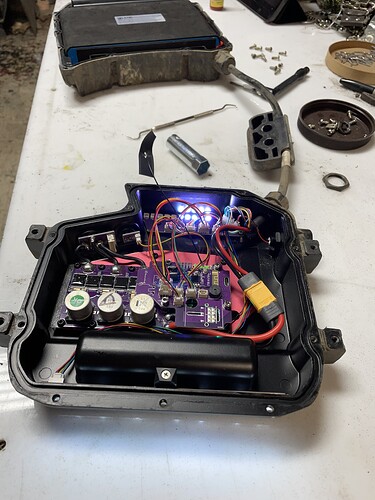
GTV Power Kit Start Guide

Prerequisites:

  • GTV Power Kit has been installed (Follow this Installation Guide on Floatwheel’s YouTube Channel)
  • The VESC Tool Mobile App has been installed (iOS / Android)
  • Patience! I know this is a lot of words, but the actual tasks are fairly simple, just be patient and take your time to follow the directions carefully. Rushing through and making mistakes could result in more headache and time lost than if you took your time the first time around.

Step 1: BACKUP YOUR CONFIGS!!

The GTV Power Kit comes pre-configured for a nearly Plug&Play experience, including an optimized Motor Config (for stock motor, a non-GT Motor would require additional setup not covered here), a hand-calibrated IMU Config, and a custom Float Package tune. There are a few things you can do to dial it in further for your specific setup, but before anything else, you should BACKUP YOUR CONFIGS! By Backing up, you give yourself the ability to Restore your configs back to the state they were in when you backed up (AKA the out-of-box configuration). This is especially important if you’ve never worked with VESC before, as it’s a failsafe in case you make any mistake while learning and tweaking things.

How to Backup (and Restore) Configs:
Make sure your board is powered on. In the VESC Tool app, scan for your board. Once it pops up, feel free to rename it (only you can see this name), and connect.

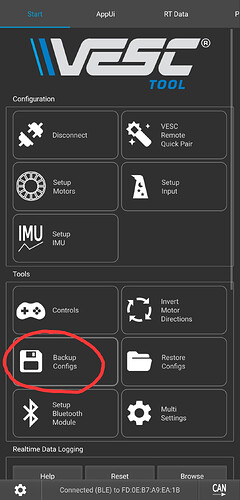
Once Connected, make sure you are on the Start tab. Find and tap the large Backup Configs button (Save/Floppy Disk Icon), and tap OK on the following pop-up. Once complete, you should see a confirmation that the Backup was successful! Now, if you’d like to revert to the out-of-box configs, you can tap the Restore Configs button right next to the Backup Configs button.


Step 2: Hall Sensor Calibration

Hall Sensor Calibrations tend to be similar motor to motor, so you may technically be able to get by without this step. However, it would be best practice to calibrate for your specific motor for an optimized ride experience.

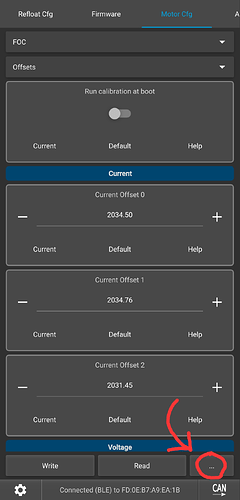
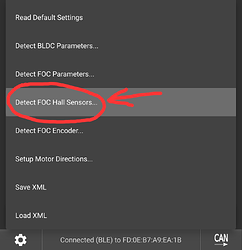
Prop your board in such a way that the motor can spin freely without contacting anything. Board angle doesn’t matter, feel free to use a workbench, milk crate, set it on the side rail, or even just lift it by the nose. Then, navigate to the Motor CFG tab, tap the button in the bottom right, and tap Detect FOC Hall Sensors

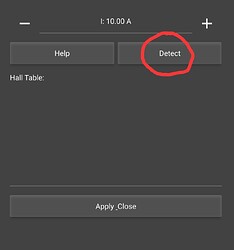
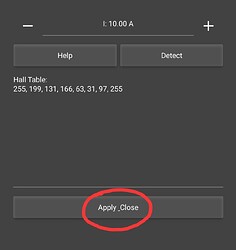
A new popup window will appear for Hall Sensor Calibration. Tap Detect (the motor will slowly spin). Once this completes and a list of values are shown, tap the Apply button on the bottom of the window. Then, tap Write in the bottom left of the screen. You should see the status bar on the bottom of the screen light up blue, confirming the change was applied.


Step 3 (Optional): Turn Off Offset Calibration at Boot

Voltage/Current Offset Calibration is something that is enabled by default and occurs on each boot. However, for most, this does not need to be run beyond the initial start-up, so you can optionally disable this to speed-up the boot time.

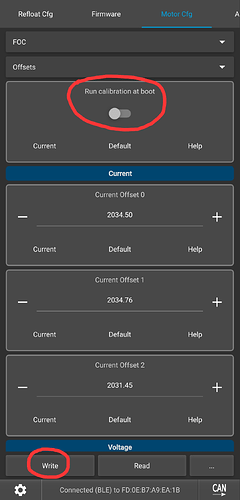
Navigate to Motor CFG → FOC → Offsets, and disable the “Run Calibration at Boot” toggle. Then, tap Write on the bottom left of the screen. You should see the status bar on the bottom of the screen light up blue, confirming the change was applied.


Step 4 (Optional): IMU Leveling (for Angled Rails)

This step is for calibrating for angled rails. If you are running flat nose rails (Stock, DubTails, 007’s), this step is NOT needed!

It may also be worth making a new Backup in case you mess up this step, so that you don’t have to re-do the previous steps. Test the board by hand and rock it back and forth, ensuring it runs smoothly. If so, feel free to make a new Backup before continuing.

First, prop the board up such that it is level (a milk crate works great for this). For symmetrical rails, such as WTF’s, this would mean the board is propped symmetrically such that the nose and tail angles are the same. For asymmetrical rails, you have a bit more lee-way, but go with what makes the most sense for what would be considered “level” (This should not be influenced by ride preferences, we can tweak the actual riding angle later if desired, under Float CFG → Tune Modifiers → Constant Tiltback).

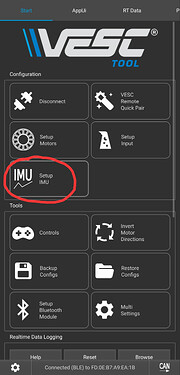
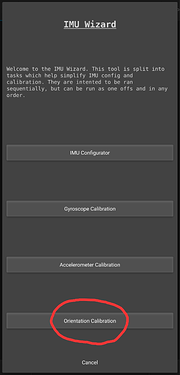
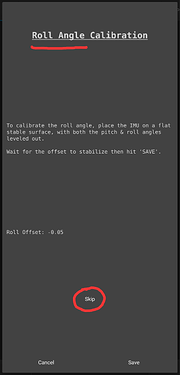
Now, navigate to the IMU Setup button under the Start tab, and tap Orientation Calibration. It will start with Roll Angle Calibration, please tap Skip for this.

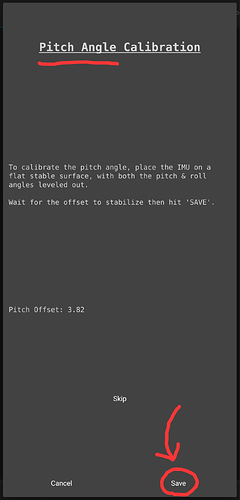
Next is Pitch Angle Calibration, which is what we care about. Make sure the board is level, and let the value stabilize (not drifting in one direction). The offset reading is based on the current calibration, so if you’re calibrating out-of-the-box, the offset reading should near match what angle you’d expect for the rails you have. If it’s way off, make sure the board is level and is on a proper level surface.

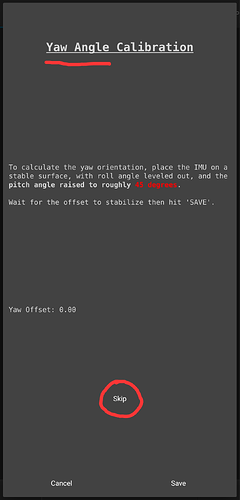
Once the value is stable and looks good, tap the Save button in the bottom right. And finally, for Yaw Calibration, we will tap Skip (NOT SAVE!), just as we did for the first Roll Calibration.

Verify your IMU Calibration:

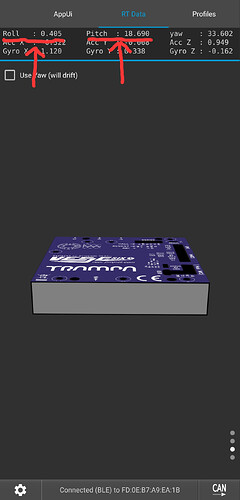
Navigate to the RT Data tab, and scroll down to where you can see IMU Data (Roll/Pitch/etc.) and a 3D model. Set your board tail down (normal resting position) and make sure the Roll and Pitch values are as we expect, with Roll being near 0 and Pitch being positive (around 20 or so depending on clearance). If this is not the case, you may need to restore your configs and try again (you possibly saved on IMU Yaw instead of skipped).


Step 5: Hand Test

Before trying to mount the board, you should perform a hand test to safely test if the board balances properly. Here’s a video on how to do so: https://www.youtube.com/shorts/4g2xmK8zSkI

If all is good and you’ve stopped Hand Test mode, you should be good to go! Once you confirm it’s riding properly, feel free to make one final backup to have on hand!


Of course, there’s more to know about VESC that will help in getting your board dialed to exactly how you want it. This article may be updated over time to include extra tips and frequently asked questions, but I wanted to at least get the essentials out there first. If you run into any issues or have any questions, feel free to ask below! Happy Riding :call_me_hand:

6 Likes

I just installed my GTV Power Kit today and I can’t seem to find “Step 3 (Optional): Turn Off Offset Calibration at Boot”

FW v6.2
HW Little_F0Cer_V3
Float Package 2.0

Not sure what to say, it’s definitely in there haha. Motor CFG tab at the top (you need to horizontally scroll through the top tabs to find it), then there should be two new dropdowns near the top that pop up, probably both saying “General”. Tap the top dropdown and switch it to FOC. Then tap the second dropdown, and switch it to Offsets. The Calibration at Boot toggle should now be there, and you can turn it off and tap Write to apply the change.

Thanks, found it!
Is there a way to extract the config file from my phone? I want to store it on the cloud for later use.
I used VESC Tool android app.

For each Config Menu (Motor CFG, App CFG, Float CFG), you can tap the “…” in bottom right and tap Save XML. Then pick where you want to save it (sometimes the default directory doesnt work for some reason, i had to make a folder), name it, and make sure the name ends in “.xml”. Then save.

1 Like

Just a word of warning that you might want take a good long look at your new hardware before you start installing it. My kit is missing an important cable and I didn’t notice until the end of the install, so now my board is out of commission for three weeks while I wait for the part. If I had looked more carefully before I started I could still be riding on my FM controller.

1 Like

Also there was another user here reporting that he had to cut off some excess from the PCB in order to make it fit:

1 Like

I got my GTV kit installed today and it’s not ridable… its twitchy and rides awful. Haven’t touched any configs only installed the float package. Maybe a config change before shipment? With the GTV kit in mass production a video or guide to set up specific values to the GT would be super helpful. Any direction to help me with a fresh install would be awesome. Currently my GTV is in the corner until I know how to make it ridable…

Was this resolved yet? I helped someone with a similar issue, not sure if you’re the same person or not. The IMU turned out to not be calibrated like it should have been, evident by all the Offsets for Orientation, Accelerometer and Gyroscope being their defaults of 0 (at the bottom of App CFG → IMU). It required a manual calibration of the IMU: [WIKI] IMU Calibration Wizard Guide (VESC Tool 6.02+)

Which Cable is missing ?

It’s the hall sensor 6wire cable that goes from the back of the motor plug to the esc.

Ouch… Yes, 6 wire straight through and 80mm long. Simple enough to make one up. I just can not recall the connector type

So far no one knows the connector type. PH2.0 can be made to fit with a bit of dremel work but it’s not quite right. Tony didn’t respond when I asked which connectors were used. I should get a replacement in another week or so.

HELP… I have stuffed up some how… New to Vesc and made assumptions.

Backed up… But also assumed that any future backup would not Overwrite…

Fitted the GTV kit and it all appeared Good and a quick foot pad test and it Ran like a new one.

Then attempted to follow the guide and found that Tabs and other slight changes were not as per the instructions re the software… I AM ASSUMING, I have touched or made a change and now the Board is not working.

Hall sensor Calibration Done. Did a Backup… but did not rename any thing
Disabled Offset Calibration at Boot - Did a Backup… but did not rename any thing
Looked at step 4 - Standard GT Rails - So Skipped, but did check… All looked OK

Re started and went to try a normal hand test, not via the App - Lights all work, a Loud Squealing but NO wheel movement !!!

At this stage I realised that doing a restore was useless as I only had one… The last one- Thus whatever setting I changed incorrectly… Was now in the backup…

Back into the App, check Hall sensors - good. Get to Hand Test mode ; lights All work but NO Motor movement. Stop Hand test function and then try it manually.

No wheel spin or movement JUST a high pitched scream mm.

That Motor Squeal indicates the configuration was likely reset to complete defaults. The likely way this happened was entering Motor Setup from the Start Tab, which pops up a message asking if you would like to reset everything to defaults. You likely tapped Yes without reading or understanding.

From here, the easiest way to proceed would be to load up the configuration files below. This will get the Motor and Float configs back to how they were (you should re-do the steps in this guide though). But you will have to re-do IMU calibration manually, as this is specific to your board. But first, we must load the files.

First, you must download the files below, each correlating to a specific tab at the top of VESC Tool (Float CFG, Motor CFG, App CFG). Go to each tab, tap “…” in the bottom right, select Load XML, and locate the correct file for that tab. Once loaded, be sure to tap “Write” at the bottom of the screen, this applies the change. And repeat this for the remaining CFG tabs.

GTV_Motor.xml (10.4 KB)
GTV_App.xml (11.8 KB)
GTV_Float.xml (5.5 KB)

Now, before IMU setup, we should disable the Float Package (to prevent engagement while setting up). To Disable the Float Package, go to the Float CFG tab at the top, and under the new dropdown at the top (likely set to “Tune”), tap that and switch over to the Specs menu. You will see a toggle that says “Disable Float Package.” Switch that toggle, and tap Write at the bottom of the screen to apply the change.

Now, you need to re-do IMU Setup. First, I would Backup from the Start tab so that you don’t have to worry about loading the XML’s again if you mess up somehow (since you don’t have a working backup currently anyways). Then, still on the Start tab, go to the IMU Setup.

You will see 4 buttons, with IMU Configurator being the first one. Since we loaded the App XML, we can skip this one and go straight to Gyro Calibration. Go through the IMU Setup process for the remaining three buttons (Gyroscope, Accelerometer, Orientation). Be especially patient and careful with Accelerometer, as it’s not obvious how to do properly just from looking at the app. I highly recommend following along with a guide, such as TheBoardGarage’s VESC Setup Video (starting at 1:00:32): https://youtu.be/YeFLmPA049o?si=OR_xu3jxu4qodTAg&t=3632

*Note, for the Orientation step, calibrate Roll and Pitch with a level board like normal, but then you can feel free to tap SKIP for the Yaw step (correct value was included in App XML). If you follow a guide properly, doing this step won’t cause any issue, it’s just skipping another point where you could potentially mess something up.

From here, it’s time to verify functionality. Go to the RT Data tab, and scroll down to the screen with a 3D model and IMU data (Pitch, Roll, etc.). Set the board tail down (normal resting position), and make sure Roll reads around 0, and Pitch reads as positive (probably ~20 degrees). Then bring the board level and make sure Roll and Pitch reads around 0. If so, go back to Float CFG → Specs, turn off the Disable Float Package toggle, then Write. Then, follow this process for hand-testing: https://www.youtube.com/shorts/4g2xmK8zSkI

If successful, you should hopefully be good to go! Once you confirm it’s up and riding properly, feel free to make a new Backup so that you have a working Backup to restore to if ever needed. If the IMU readings aren’t as expected, you likely messed something up in the calibration process. Restore your backup and be sure to be as patient as possible, reading/watching steps carefully from a trusted guide.

2 Likes

I would have to break mine open to double check, but if it is the same size as all the other smaller connectors: it is a JST GH1.25 connector. There are some easy kits you can pickup to build your own connector.

Can also be very helpful if you ever want to wire a remote into the pwm input on the LCM

https://a.co/d/05WoWpzb

It it not Gh1.25 it’s also not PH2.0, but that can be made to work temporarily with a little dremel work